

Since 1/160th (the rough scale of a 10mm tall figure) is a whole new scale for me I need new terrain. For my first scenario that means I need to create some roads, a small river, some high ground, and who knows how many trees.
 |
| 99 cent foam sheet |
I started with the river. Years ago I obtained a piece of foam sheeting intended for crafters. It was roughly 2mm thick, flexible and easy to cut. I apparently disposed of it somewhere along the line but as I was perusing a newly opened Michael's crafts store in my area I saw some in various colors. I bought two 12x18 inch sheets in a tan color to experiment in making roads and rivers. I cut one sheet into wavy strips to use for the river. Using a fairly wet brush it's easy to paint various shades of green and gray to represent a stream. However, I want the waterways to have a high gloss finish. I think glossy water adds a great deal of realism to the tabletop. My first attempt was to simply coat the stream sections with floor wax. I've started using floor wax on figures for various amounts of gloss depending upon how much water you mix with it. Straight wax provides a high gloss finish on hard surfaces. I discovered that the foam can absorb a tremendous amount of watery wax. After six coats of wax the stream sections exhibited only a slight sheen. Fail.
The next attempt was more successful. My old standby, Aileenes Tacky glue. The most difficult part of the process was spreading the glue over the section of stream. The underlying foam is so light that it invariable stuck to my fingers as I spread the glue. But with practice and keeping my finger wet by dipping it into a bowl of water I was finally able to get the result I wanted. Three coats of Aileenes provided just the gloss for which I was looking. Once the final coat had dried I ran a bead of glue along each edge and applied grout and flock to define the stream banks. Though Aileene's maintains flexibility after drying I don't know how the river sections will withstand the passage of time. Hopefully, they will not develop any curl and remain flexible for years.
 |
| River sections before painting |
One sheet of craft foam provided me with ten feet of river for a total cost of 99 cents. My inner cheapskate is satisfied!
Trees designed with 25mm figures in mind look monstrously large when used with 10mm figures. Though to be honest the height is probably more realistic. Wargamers almost always under represent the height of trees on their tables. Much of the American Civil War was fought in wilderness areas. I think I will need several hundred tiny trees. And I like realistic looking terrain. Frankly, buying hundreds of tiny realistic tress isn't in the budget. I'm not even sure buying that much clump foliage is in the budget.
 |
| Cheap trees (treaps?) |
So here's the cheapest, easiest solution I could come up with: 1) Swipe a pack of 1 inch wire nails from your garage. Everybody's got these, right? How else do you hang up pictures of great military exploits in your man cave? 2) Glue the head of the nail to a penny. Let's face it, we've all got pennies littering our homes. Their only use is for cashiers to hand them back to you when you buy something to make you feel that you're not spending as much as you think you are. Put those copper coated nickel discs to work beautifying your wargame table. 3) Pilfer an ordinary kitchen sponge out from under your sink. I'd recommend one of those cheap ones with the large pores. Preferably a new, unused one but, hey, you gotta do what you gotta do. 4) Rip the sponge into irregular pieces, roughly ½ inch by ½ inch and impale the sections of sponge onto the nails as they stand upright on their pennies. Dab plenty of glue under and between the sections of sponge so that when dry they are securely attached to the nail. You may want to use a water impervious glue for this. The sponge will tear into irregular pieces. In fact, I found it surprising difficult to rip up the sponge and used two pair of pliers to do the deed. The violence necessary provided an odd sense of satisfaction. At this point you could paint the nail and the base the appropriate colors but the order of painting is not particularly important.
Here's the part that challenged my creativity. I pilfered a light green sponge. But even after applying flock to the sponge to represent the foliage of the tree, the pastel green showing through bothered me. So how could I paint the sponge? At first I though of using brown spray primer. That's probably the easiest thing to do but… I've avoided aerosols for many years now and that would require me to buy something which I don't already have. (The cheapness of my river sections has really inspired me to come up with truly inexpensive solutions. I'm enjoying the challenge of budget gaming.) It's almost impossible to paint a sponge with a brush. You simply can't get the brush bristles into the sponge pores. I thought about using fabric dye. That's a cheap solution and worth filing away. I ended up dipping the sponge portion of the tree into a bowl of water (this is why I suggested a water impervious glue) and then daubing black artists gesso onto the sponge with a brush. The natural capillary action of the wet sponge will draw the pigment into the interior areas providing you with a fairly uniform color. Success! Let the sponge dry—for several days—and then proceed to flock the sponge and the base. Viola! Cheap, easy-to-mass-produce tiny trees. My first fifty trees cost me absolutely nothing (but time). I think I can make about 500 trees for $8.00 or so. Booyah! Cha-ching!
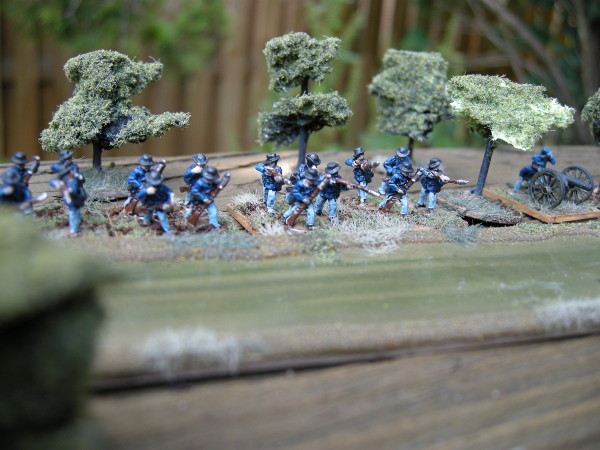 |
| Federal troops defending the river |
 |
| The tree on the right is the first, unpainted one |
 |
| The river is glossy enough for my tastes |
No comments:
Post a Comment